 |
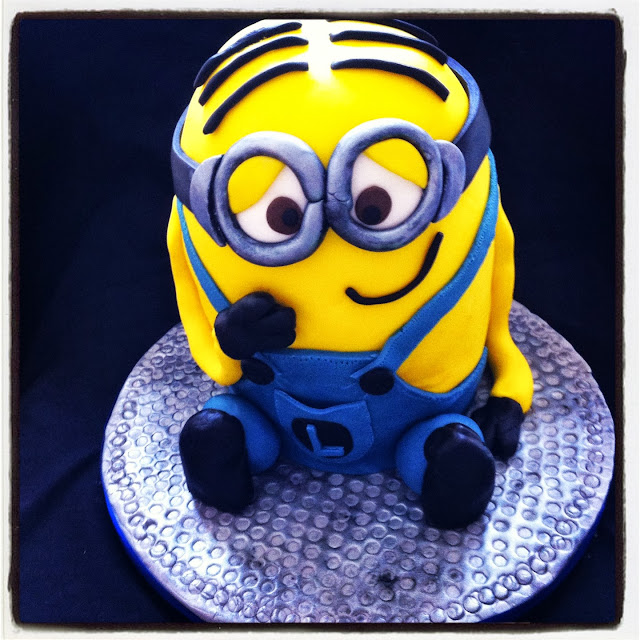
| Lucas's very own Minion! Say, "Bello!" |
Ever since Lucas and Dave watched Despicable Me 2 they've been speaking to each other in Minion-ese. This is both very cute and (at times) annoying. (I don't speak Minion, but I am fluent in sarcasm and snark, if you need translation services.) Given Lucas's deep love for Minions, I thought that they'd make a great birthday cake!
In case you aren't familiar with Minions, feast your eyes on these cute little guys...
I always like to keep Lucas's cake a secret from him, and usually this is pretty easy. I just plonk it on the dining room table, tell him not to go in there--
insert dire threat here--and build a fort around it for good measure. This year, though, there was a teacher's strike on the day I'd planned to leisurely decorate it, so Lucas was at home. This sent me into a bit of a tailspin.... "But I was going to decorate his cake!" I wailed. "How'm I supposed to keep it a secret now?"
After I dried my eyes I decided that if I baked one or two of the cakes I needed, and froze them, then I could probably manage to decorate it on Friday in between errands and teaching at school in the afternoon. (Teaching sewing, I should add. Please don't mistake me for a
proper teacher. They're bona fide saints.) So that's what I did. I also decorated a cake board to resemble industrial metal flooring, just the thing for Gru's lair.
On Thursday I defrosted the cakes and baked a third cake in a small Pyrex bowl for the rounded top. I could have baked another 6" layer and carved, but I am lazy and Pyrex works out pretty well usually. (You can get proper metal hemisphere tins which would be even better, I'm sure.) I also coloured loads of fondant and set butter out to soften so that I could get started first thing in the morning.
There are
loads of fantastic tutorials on the internet which will help you make your own Minion cake, so I'm not going to rehash everything. I found this video particularly helpful: Minions come in all sorts of shapes and sizes, so you can't really go wrong.
Also, this
fantastic tutorial from Sweetie Darling was really helpful for making hands and feet.
 |
| Close-ups on the goggles and overalls of the Minion |
Lucas
loved his Minion! The first thing he said was, "Bello!" to it, which was pretty cute, and then he gave me a big hug. Aww... I'm really pleased with how he turned out, especially the eyes which seem to have Mona Lisa qualities to them--they seem to follow you around the room... He was a huge hit at Lucas's party and I was really sad to cut into him. By the time we'd cut enough pieces of cake for the party bag it looked like we'd performed a lobotomy. Being a Minion is hard sometimes...
Top Tips!* Use ready-made black icing. You'll never manage to tint icing dark enough with gel colours!
*Use string to measure how wide you need to roll your fondant out and keep it handy as a guide, especially if you use two pieces of yellow fondant to cover the minion.
* Roll the strip of fondant around the rolling pin to avoid dreadful tears in the fondant. (I forgot to do this, and my Minion has clearly been in a fight if you look at his back... Oh, look! I forgot to take a picture of that :P)
* Use proper edible glue rather than water or vodka to stick on the eyes/goggles/arms etc.
Gel colourings usedSugarflair Melon (perfect Minion yellow)
Sugarflair Navy
Sugarflair Dark Brown
Wilton Black (to colour fondant grey for the board)
High Density Chocolate SpongeRecipe by "The Dinosaur" from the British Sugarcraft Guild Forums
Makes a deep 6" round cake
175g unsalted butter (very soft)
185g caster sugar (use the proper stuff not supermarket own brands)
175g eggs, beaten (weighed out of their shells)
40g cocoa powder
135g McDougall's sponge flour
1/4t baking powder
1/4t espresso powder
pinch of salt
1 1/2T water
Preheat oven to 150C (130C fan oven). Line a
deep 6" round tin and place on a baking sheet. You'll also need a larger tin to invert over this one.
Place all ingredients in a mixing bowl (easiest with a stand mixer, but you could use a hand-held electric whisk, too). Beat on slow speed until all traces of butter are gone. Raise speed to medium and beat for 2 minutes. The mixture should start to go pale. Raise speed to full and beat for 1 minute. The volume of the mixture expands quite dramatically.
Scrape into tin, level and place on tray. Cover with a larger inverted tin and place in the oven. Bake for approximately one hour according to the original author, removing the covering tin half-way through once all the rising has happened. I found that it took
much longer, but my oven is a little unreliable these days. Test for doneness with a skewer in the middle of a cake; it should come out clean. Cool on a wire rack.
NB.
The purpose of the covering tin is to prevent the sides of the cake from overbaking before the centre is done. It's also supposed to make for a flatter top on the cake, meaning less wastage when you come to level it.twitter | pinterest | instagram | bloglovin'


